From TypeScript specs to any platform
Instrumenting our UCDef mechanism to have it available on multiple platforms (Server, CLI, Web, Mobile, LLM...).
In the previous article, we've started explaining how to define software specs in TypeScript. To illustrate the idea, we've started prototyping a "Trading" app, which first use case is BuyAsset. Let's continue our journey by showing how our "meta-framework" instruments it to make it available on multiple platforms.
In the article, we will go over each platform and explain how use cases are instrumented to make the whole thing work.
Server
The server is the central piece of any multi-tier architecture. Most of the processing happens there. Clients send requests and the Server replies.
fik-sdk provides the notion of ServerManager. It's a basic interface that looks like this :
// Generics omitted for clarity
export interface ServerManager {
    init(): Promise<void>;
    mount(ucd: UCDef): Promise<void>;
    start(): Promise<void>;
    stop(): Promise<void>;
}
There are already two implementations available : ExpressServerManager (express) and HonoServerManager (hono).
Naturally, this generic interface can be implemented with any other server technology, including but not limited to :
- Node.js HTTP server (if you're a warrior)
- Fastify
- adonis
- etc...
... As long as it provides everything necessary to comply with what ServerManager expects (authentication, security, CSP, logging, etc.).
To create a server on fik-sdk, mounting our use case, it's requires only a few lines :
const container = new Container(CONTAINER_OPTS);

// If you're an express afficionado
container.bind<ServerManager>('ServerManager').to(ExpressServerManager);

// Or if you're a hono one instead
container.bind<ServerManager>('ServerManager').to(HonoServerManager);

await container.get(ServerBooter).exec({
    srcImporter: (path) => import(/* webpackIgnore: true */ path),
});
That's all you need to get a server ready, running and exposing a secure endpoint for our use case.
If you remember well, in the previous article, we've defined lifeycle.server in our UCDef. It's typically when we mount the use case that we choose the right security schemes, define the request handler, format the response, etc.
$> pnpm tsc --project tsconfig.build.json --outDir dist # Build
$> node dist/server/index.js # Start

Creating HTTP server { port: 8080 }
Mounting {
 contract: {
   contentType: 'application/json',
   envelope: 'json',
   method: 'POST',
   path: '/api/v1/Trading_BuyAsset'
 },
}
Listening on http://localhost:8080
Building and starting the server1 use simple tools as much as possible. Although tsc is slower than esbuild or swc, for this kind of use case it's totally ok. Note that fik-sdk does not impose any tooling. BYOT !
$> curl -X POST -H "Content-Type: application/json" -d '{"code":"US0378331005","limit":235.12,"qty":250}' http://localhost:8080/api/v1/Trading_BuyAssetAnd it's as simple as that to call it. If you're diligent, you'll know that this request will return a 401 since the policy has been set to AuthenticatedUCPolicy. Therefore, the server expects a valid JWT. There are also other authentication schemes that you can define at the use case level.
Clients
Even though curl is a pretty handy tool, we cannot ask our customers to use it to send their buy orders. Hence the need to implement fancy clients.
CLI
CLI is not the fanciest one, but it's still pretty practical, especially for developers. Just like ServerManager, fik-sdk provides a generic interface for CLI applications.
Whether it is using Node.js parseArgs, stricli, commander.js or any other alternative, you can use the implementation of your choice as long as it complies with the interface.
Basically, fik-sdk mounts the use cases as commands and provides the usual commands like --help, --version, etc.
$> pnpm tsc --project tsconfig.build.json --outDir dist # Build
$> node dist/cli/index.js --help # Start

Super Trading
[Common Commands]

  BuyAsset           Place an order of type "Buy" corresponding to the specified code
      --code         (mandatory) The ISIN code of the security you want to buy
      --limit        (mandatory) The limit at which you want to execute the order
      --qty          (mandatory) The quantity of assets to buy

[Core Commands]

  --help             View the available commands
  --version          View the version of the CLI
All the documentation is automatically and dynamically computed from the UCDef for you.
$> node dist/cli/index.js BuyAsset --code US0378331005 --limit 235.12 --qty toto

Executing use case : Buy asset
[Error] : Qty must be a valid number
And naturally, validation comes out of the box client AND server side, based on the types we've defined (more on this in a next article). Again, as you can see, everything is derived from the UCDef.
Web
Unlike CLI, the Web is GUI-based. The way fik-sdk handles clients with a GUI, is by providing the UIRenderer interface. This article being already very pretty long, we won't go in the details. But this interface defines how to render the "controls" (typically form fields, but not limited to it).
Said differently, the UIRenderer is more or less an "advanced" Design System.
The first we've developed is NextJSBootstrapUIRenderer. As its name implies, it's compatible for websites based on Next.js and Bootstrap.
Note that fik-sdk is not opinionated in terms of UI rendering. Therefore, it can be used with anything (e.g. Tailwind). Plus, it's not opinionated neither on the structural stuff (pages, screens, routing, etc.). It's up to you to define your pages however you want.
Out of the box, we provide the following components : UCPanel and UCEntrypoint. These are generic React components where UIRenderer is injected.
Here is an example of how to write a React component embedding a use case :
export default function BuyAssetComponent(): ReactElement {
    const [buyAssetUC] = useUC(Manifest, BuyAssetUCD);

    return (
        <h1>{buyAssetUC.label()}</h1>

        <p>{buyAssetUC.description()}</p>

        <UCPanel
            form={{
                onInit: async (uc): Promise<void> => {
                    // You can pre-fill the use case with some contextual data (e.g. isin from routing)
                    uc.inputField('isin').setVal(isin);
                },
            }}
            onDone={async (ucor): Promise<void> => {
                // Get the output of the use case (client side and/or server side) to make the next action
                // e.g. : redirecting
                // e.g. : display a toaster
                // e.g. : hide the panel
                // etc.
                const { executedDirectly } = ucor.item00().item;

                if (executedDirectly) {
                    alert('Your order has been successfully executed');
                } else {
                    alert('Your order has been queued for execution');
                }
            }}
            onError={async (err: Error): Promise<void> => {
                alert('Oops ! An error occurred !');
            }}
            uc={buyAssetUC}
        />
    );
}
UCPanel is clever enough to show the form if applicable, pre-fill the use case, handle/show the errors, submit the use case, etc. It provides callbacks you can use to interact with the rest of the application. For instance, we can imagine using the router to redirect after a successful submission.
On the other hand, UCEntrypoint usually represents a link, a button or anything else, giving access to a use case. Depending on the lifeycle.client.policy, the current user authentication, and other parameters, the control is displayed or not.
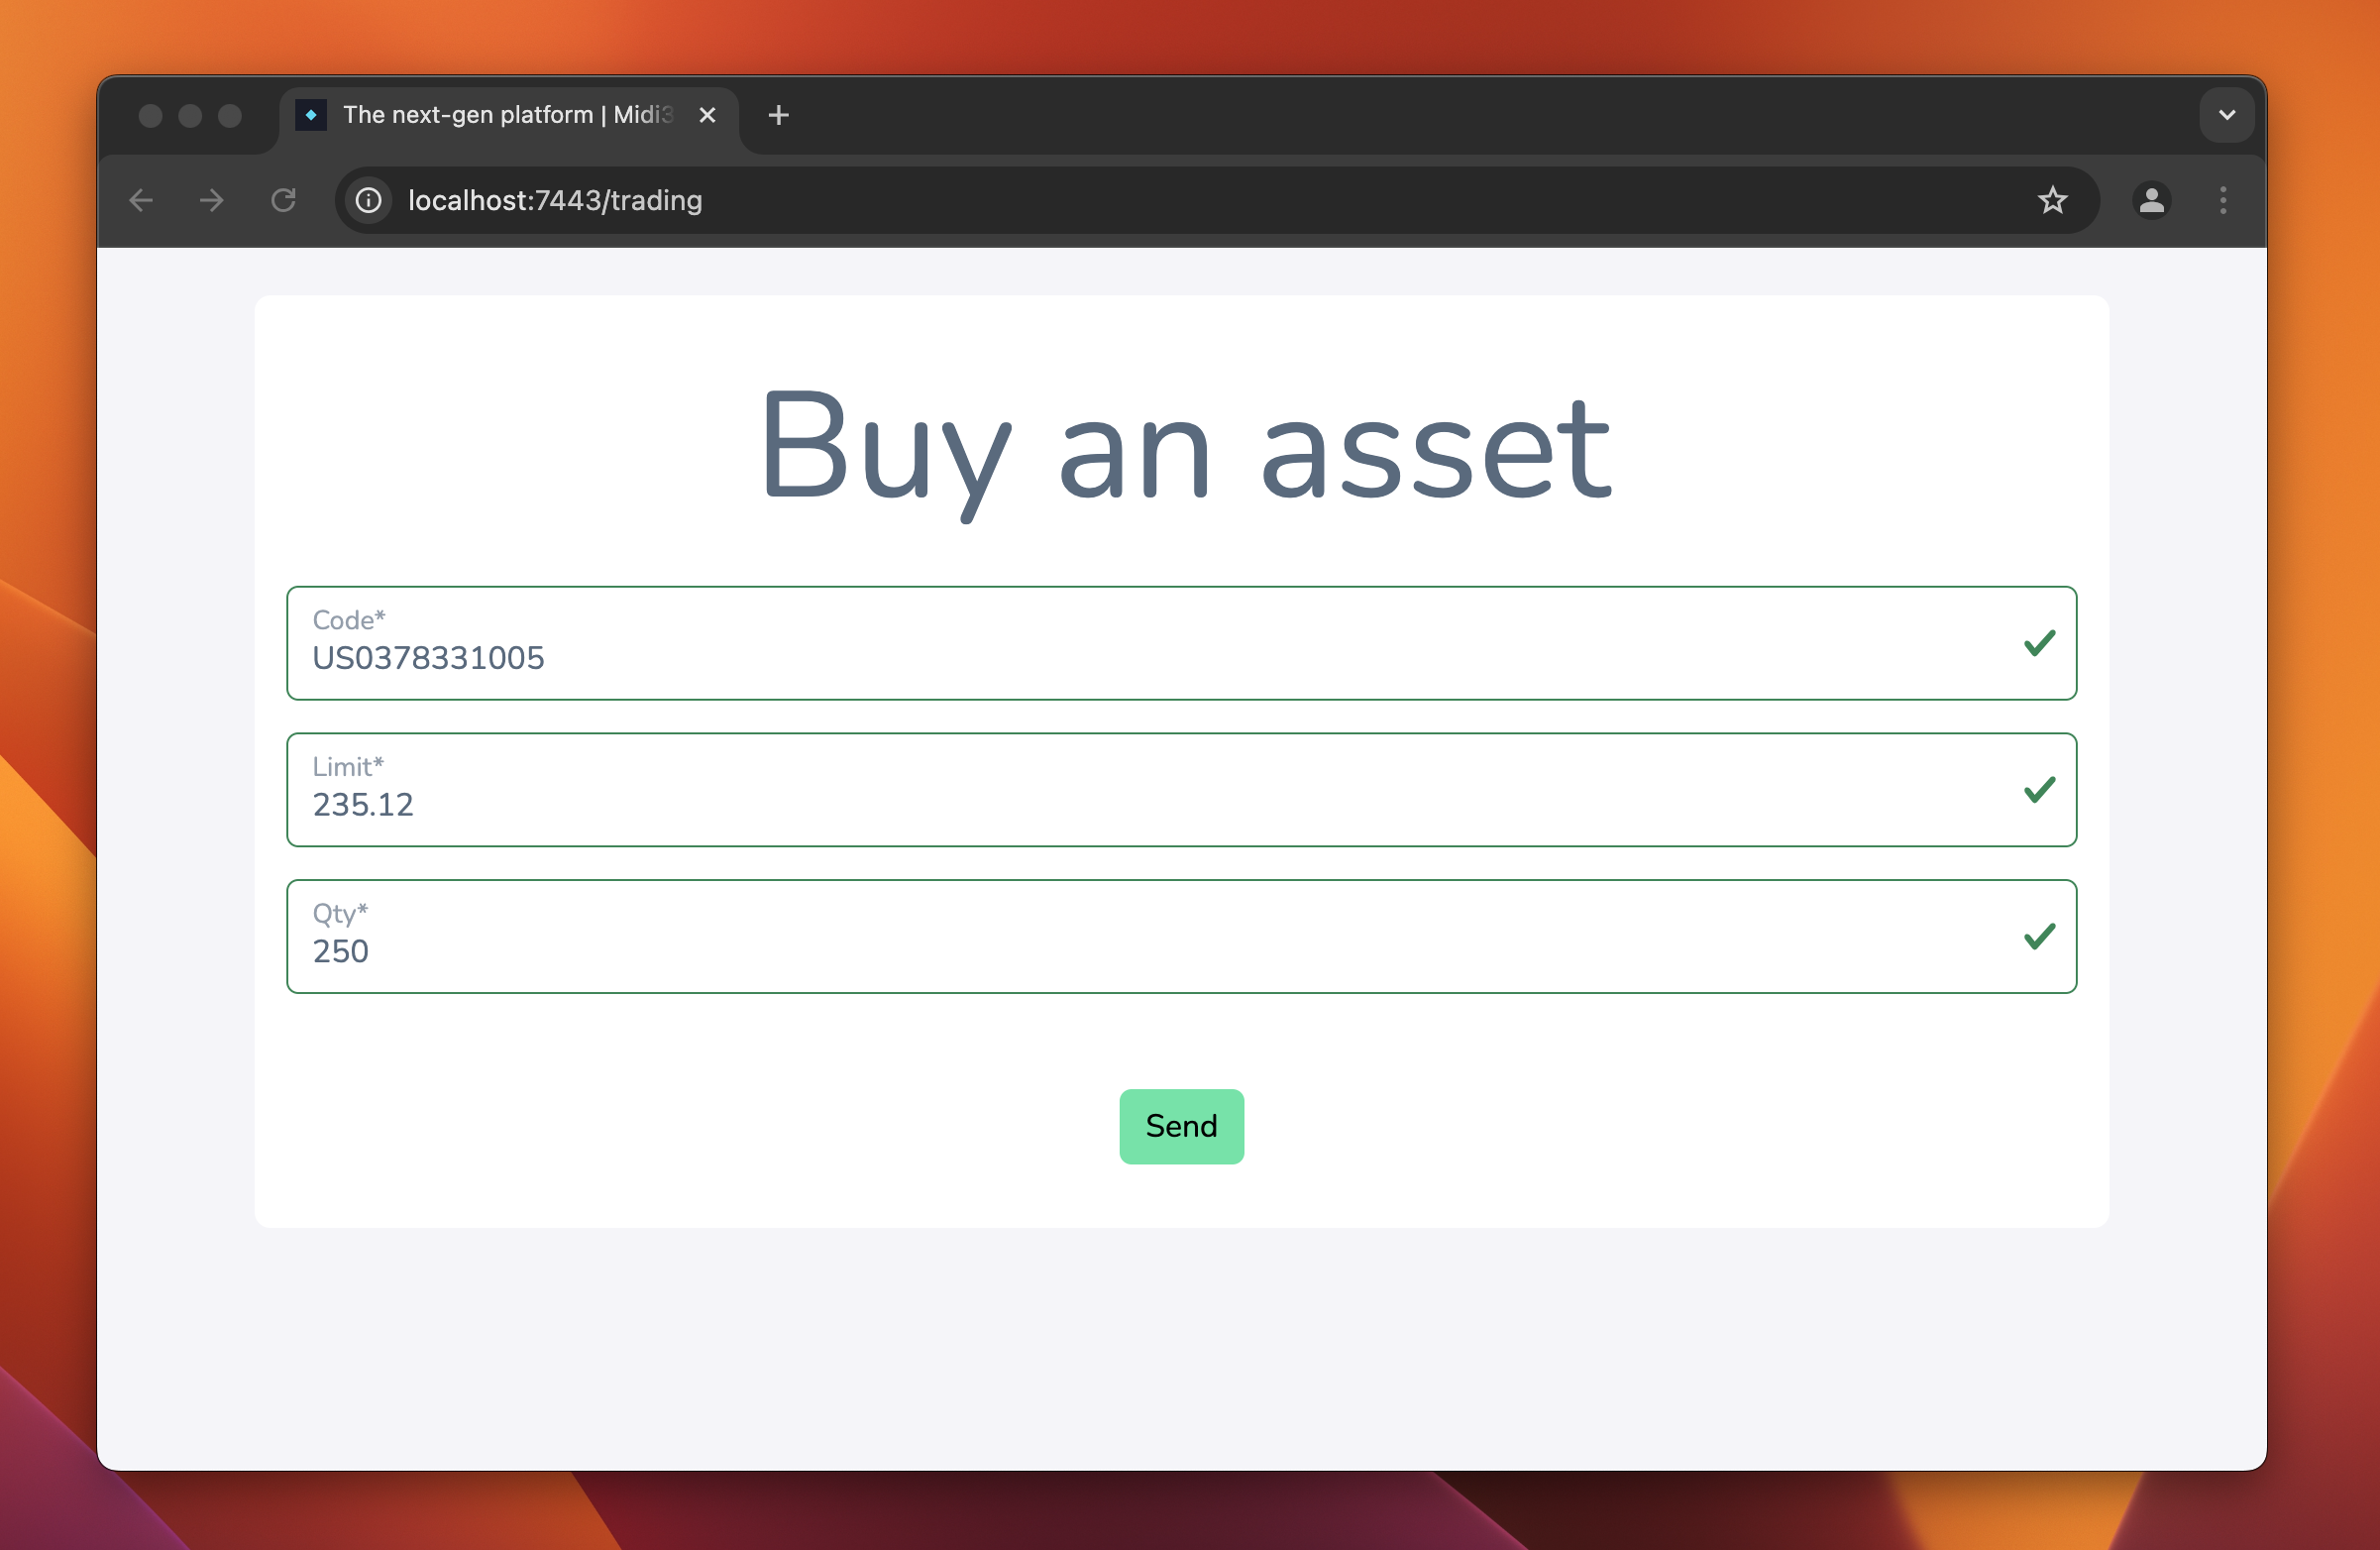
 Buy asset on NextJS/Bootstrap
As you can see in the screenshot, above, integrating a use case in a page in straightforward. Naturally, here it it takes the whole page, but we can imagine integrating it in a bigger page, with content, pictures, etc.
Mobile
Since it's also GUI-based, works the exact same way as Web. The only difference is that it needs a different UIRenderer. We've developed the RNUIRenderer to render use cases on React Native.
Typically, where on Web you would render a <input type="number" />, in React Native you render a <TextInput inputMode="number" />, et voilà !
And the beauty of the thing is that since they're all based on React, we can reuse the exact same UCPanel and UCEntrypoint components. One logic, multiple platforms.
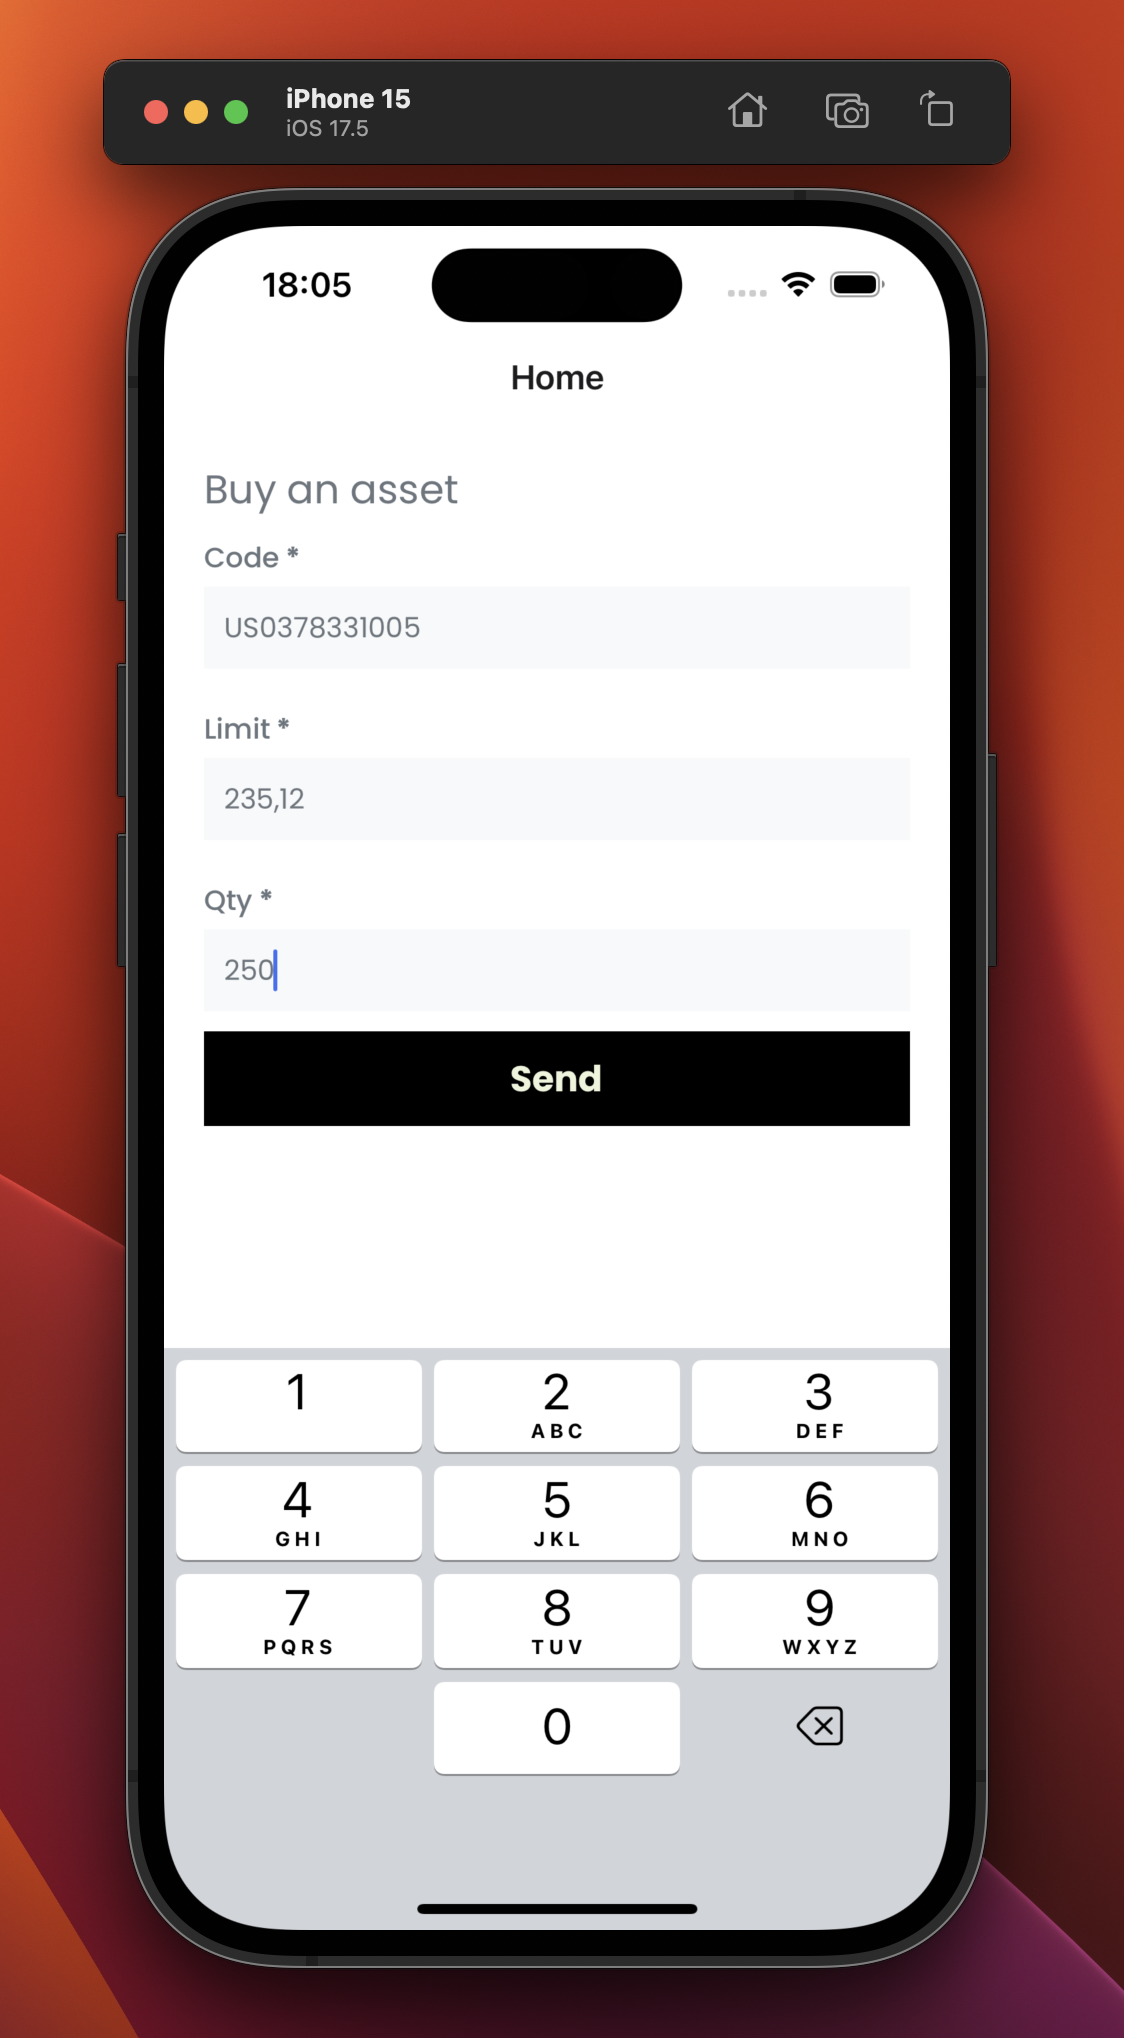
 Buy asset on React Native
And here is how it looks like : same UCDef, same UCPanel, different style, different platforms.
LLM
Do you start seeing how the use case mechanism can be articulated when plugged in with an LLM, and how powerful this can be ? We'll let you think about it and we'll explain in our next articles.
Conclusion
It's already time to wrap up, even if there so much to say and explain.
In this article, we've seen how each platform can instrument a single and unique UCDef. The agnosticity of the use case def makes it compatible everywhere : the server mounts an endpoint (when applicable), the cli mounts a command, the web/mobile mount a form/button and so on...
One important thing to note : there is absolutely no code generation whatsoever. Since everything is written in TypeScript, we can fully rely on it to plug everything everywhere : 100% modularity. Add a field in the UCDef and redeploy all the platforms. It just works.
Stay tuned.
1 If you cry when you see RPC style URLs, please be patient, we'll explain.
Chafik H'nini